
So, how many PSI in a basketball? The standard is between 7 and 9 PSI. Getting this right is key to a great game.
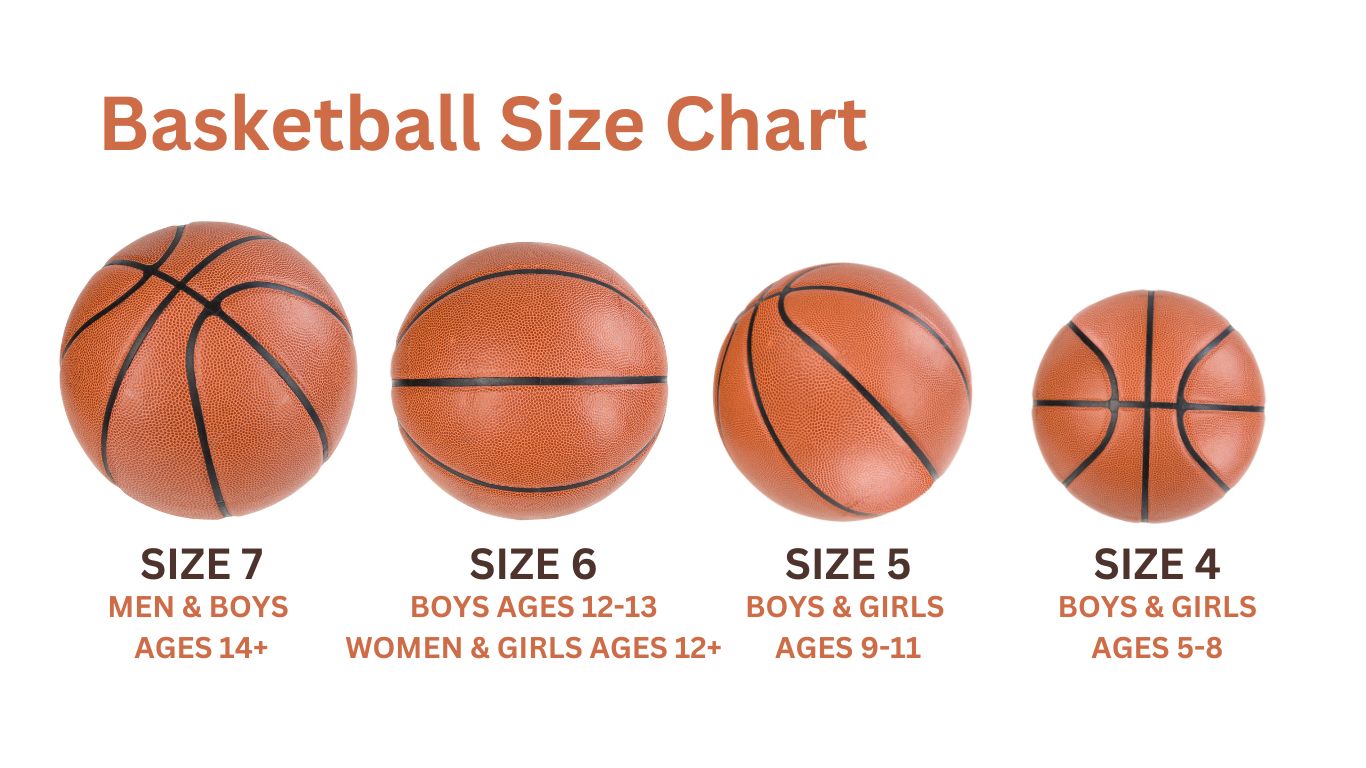
Image Source: 149347557.v2.pressablecdn.com
Why Proper Basketball Inflation Matters
Inflating a basketball correctly is more than just a suggestion; it’s a fundamental aspect of the game that impacts performance, player safety, and the lifespan of the ball itself. Too little air, and the ball feels soft and unresponsive, making dribbling and shooting feel sluggish. Too much air, and the ball becomes hard and bouncy, increasing the risk of injury and making it difficult to control. This guide will help you master the art of proper basketball inflation.
The Impact of Basketball Pressure on Play
The basketball pressure is a critical factor in how a ball behaves on the court. Imagine a perfectly inflated basketball; it has a consistent bounce, predictable trajectory, and a satisfying feel when you handle it. This is the ideal basketball game pressure.
- Bounce Consistency: The right PSI level for basketball ensures a predictable and consistent bounce. This allows players to anticipate how the ball will react when dribbled or rebounded.
- Grip and Feel: The correct inflation provides a firm yet yielding surface, offering optimal grip for players to control passes, shots, and dribbles.
- Shot Performance: A properly inflated ball contributes to accurate shooting. The ball’s shape and rigidity affect its flight path and spin, crucial for sinking baskets.
- Dribbling Control: When a basketball has the required PSI for basketball, dribbling becomes more efficient and less strenuous. The ball doesn’t sink too much, allowing for quicker, more responsive dribbles.
Safety First: Preventing Injuries
An improperly inflated basketball can lead to various injuries.
- Too Soft: A ball that is too soft can be difficult to grip securely. This can lead to fumbles, loss of control, and potentially awkward movements that strain wrists or fingers. Players might try to compensate by gripping too tightly, causing hand fatigue.
- Too Hard: Over-inflating a basketball makes it excessively bouncy and hard. This increases the impact on hands and wrists during dribbling and shooting. Players might experience hand pain, bruising, or even more serious injuries like sprains if the ball ricochets unexpectedly. It can also cause discomfort when receiving a hard pass.
Extending the Life of Your Basketball
The right basketball air pressure also plays a role in how long your basketball lasts.
- Over-inflation: Puts undue stress on the seams and bladder of the ball. This can lead to premature wear, seam separation, or even the bladder bursting.
- Under-inflation: While less damaging, a consistently under-inflated ball can lose its shape over time, becoming lumpy or oval. This affects its performance and can make it uncomfortable to play with.
Deciphering the Recommended PSI for Basketball
The question of “how much air in a basketball?” is best answered by referring to the manufacturer’s recommendations. However, there’s a widely accepted range for most basketballs.
The Official Standard
Most basketballs, whether for professional play, amateur leagues, or casual use, are designed to be inflated to a specific pressure range. The National Basketball Association (NBA) has its own standards, which are often mirrored by other sporting bodies and manufacturers.
- NBA Specification: According to the NBA rulebook, a basketball should be inflated so that when dropped from a height of approximately 6 feet (1.8 meters) onto the court, it will bounce to a height of between 49 and 54 inches (1.24 and 1.37 meters), measured from the bottom of the ball. While this is a performance-based measure, it directly correlates to a specific basketball pressure.
- General Rule of Thumb: For most basketballs, the recommended PSI basketball is between 7 and 9 PSI. This range provides the optimal balance of bounce, feel, and control.
Reading the Ball: Where to Find the PSI Information
Many basketballs have the inflation instructions printed directly on them, often near the valve. Look for a small inscription that typically states the recommended pressure in PSI (pounds per square inch) and sometimes kPa (kilopascals).
- Locating the Information: This information is usually found subtly printed on the ball’s surface. It might be small text near the air valve or a small graphic.
- Units of Measurement: Be aware of the units. PSI is the most common in North America. kPa is used in other parts of the world. For reference, 1 PSI is approximately equal to 6.895 kPa. So, 7-9 PSI is roughly 48-62 kPa.
What If Your Ball Doesn’t Have an Inflation Guide?
If you’ve purchased a ball that lacks any printing or you’ve lost the packaging, you can generally assume the 7-9 PSI range is appropriate.
- Brand Specifics: Different brands might have slight variations, but the 7-9 PSI range is a safe bet for almost all standard basketballs.
- Testing the Bounce: As a practical test, if you don’t have a basketball pressure gauge, you can perform the NBA bounce test described above. If the ball bounces too high or too low, adjust the air pressure accordingly.
How to Inflate a Basketball Correctly: A Step-by-Step Basketball Inflation Guide
Inflating a basketball is a simple process, but doing it correctly ensures you get the most out of your ball.
Essential Tools for Inflation
To properly inflate your basketball, you’ll need a few key items:
- Basketball Needle: This is the thin, hollow metal pin that inserts into the air valve of the basketball. Ensure it’s a needle specifically designed for sports balls, as they are usually brass or nickel-plated for durability.
- Air Pump: This can be a manual hand pump or an electric pump. Hand pumps are portable and widely available.
- Basketball Pressure Gauge: This is crucial for accuracy. While you can estimate, a gauge ensures you hit the required PSI for basketball precisely. There are various types, including dial gauges and digital gauges.
The Inflation Process: Step-by-Step
Follow these steps for the best results:
Prepare the Needle:
- Moisten the Needle: Before inserting the needle into the ball’s valve, moisten the tip with water or saliva. This helps it slide in smoothly without damaging the valve and prevents air from escaping prematurely.
- Attach to Pump: Securely attach the moistened needle to your air pump.
Locate the Valve:
- Find the small rubber valve on the basketball. This is where the air enters.
Insert the Needle:
- Gently but firmly insert the moistened needle into the valve at a slight angle. Avoid forcing it straight in, as this can damage the valve.
Start Pumping:
- Begin pumping air into the ball. If using a manual pump, use smooth, consistent strokes.
Monitor the Pressure:
- This is where the basketball pressure gauge comes in handy.
- Using a Gauge: If you have a gauge, attach it to the pump’s nozzle before inserting the needle, or remove the needle briefly and attach the gauge to the ball’s valve to check the pressure. Pump until the gauge reads the desired PSI (typically 7-9 PSI).
- Without a Gauge: If you don’t have a gauge, you’ll need to rely on feel and the bounce test. Inflate the ball until it feels firm but not rock-hard. Then, drop it from waist height. If it bounces back to about chest height, it’s likely close. If it splatters or doesn’t bounce well, it needs more air. If it bounces too high, it’s over-inflated.
Remove the Needle:
- Once the ball reaches the correct pressure, carefully remove the needle from the valve.
Test the Bounce:
- Drop the ball from shoulder height onto a hard surface. It should bounce back to about your shoulder or slightly higher, demonstrating the correct basketball air pressure.
Check for Leaks:
- Listen for any hissing sounds around the valve, which might indicate a leak.
Common Mistakes to Avoid
- Dry Needle: Never insert a dry needle into the valve. This can tear the rubber and cause leaks.
- Over-Pumping: Pumping too much air is a common mistake. It can damage the ball and make it unsafe to play with.
- Using the Wrong Needle: Ensure you’re using a proper sports ball needle. Craft needles or sewing needles are too small and can damage the valve.
- Forcing the Needle: Be gentle when inserting the needle to avoid puncturing the bladder incorrectly or damaging the valve.
Maintaining Optimal Basketball Air Pressure
Once your basketball is properly inflated, maintaining that pressure is key to its performance and longevity.
How Often Should You Check Basketball Pressure?
The frequency of checking your basketball’s pressure depends on usage and environmental factors.
- Regular Use: For balls used frequently, checking the pressure weekly or bi-weekly is a good practice.
- Infrequent Use: If the ball is used only occasionally, check it before each significant playing session.
- Temperature Changes: Temperature fluctuations can affect air pressure. Balls tend to lose pressure in colder conditions and gain pressure in warmer ones. This means you might need to adjust the basketball pressure more often if you play in varying temperatures.
- Storage: Storing the ball in a cool, dry place can help maintain its air pressure.
Signs Your Basketball Needs More Air
Your basketball will give you clues when its basketball air pressure is low.
- Reduced Bounce: The most obvious sign is a noticeable decrease in bounce height.
- Soft Feel: The ball will feel softer and less firm to the touch.
- Lack of Responsiveness: Dribbling will feel less crisp, and the ball might feel “dead” or sluggish.
- Visible Deformation: In severe cases of under-inflation, the ball might start to lose its perfectly round shape.
Using a Basketball Pressure Gauge: Accuracy is Key
A basketball pressure gauge is your best friend for ensuring consistent and accurate inflation.
Types of Gauges:
- Dial Gauges: These are common and affordable. They have a needle that points to the pressure reading on a circular dial.
- Digital Gauges: These offer more precise readings and are often easier to read.
How to Use Effectively:
- Check Before Pumping: Before adding any air, use the gauge to see the current pressure.
- Pump and Re-check: Pump a few times, then remove the needle and attach the gauge to get a reading. Repeat until you reach the target PSI.
- Calibrate if Necessary: Some digital gauges can be calibrated, ensuring consistent accuracy.
Troubleshooting Common Basketball Inflation Issues
Even with the best intentions, you might encounter a few problems.
My Basketball Won’t Hold Air
This is usually due to a faulty valve or a small puncture.
- The Valve: The air valve itself might be damaged, or the needle might have been inserted incorrectly, causing damage.
- Check the Valve: Inspect the valve for any visible tears or cracks.
- Needle Insertion: Ensure you always moisten the needle and insert it gently.
- Small Punctures: Tiny holes in the ball’s surface or seams can cause slow leaks.
- Submersion Test: For very slow leaks, you can try submerging the inflated ball in a tub of water and looking for small streams of bubbles.
- Solution: For minor valve issues, sometimes re-inserting the needle firmly can reseat it. For persistent leaks or punctures, the ball might need to be replaced.
My Basketball Feels Too Hard or Too Soft After Inflation
This is a direct result of incorrect basketball air pressure.
- Too Hard: You’ve likely exceeded the recommended PSI basketball. Deflate the ball slightly by carefully pressing the needle into the valve without pumping. Use your pressure gauge to get it within the 7-9 PSI range.
- Too Soft: You haven’t added enough air. Continue pumping and checking the pressure with your gauge until it feels firm and bounces correctly.
The Needle Won’t Go In
This is usually due to a dry needle or a valve that’s slightly stuck.
- Moisten the Needle: Always moisten the needle first.
- Gentle Angle: Try inserting the needle at a slight angle.
- Valve Condition: If the valve seems stuck, a very gentle wiggle might help, but avoid excessive force. If it feels completely blocked, there might be an issue with the valve.
Beyond the Standard: Specialized Basketballs and Their Inflation
While the 7-9 PSI range is standard for most basketballs, some specialized balls might have slightly different required PSI for basketball.
Indoor vs. Outdoor Basketballs
- Indoor Balls: Often made with higher-quality leather or composite materials, these are designed for optimal grip and feel. They typically adhere strictly to the 7-9 PSI range for the best performance on polished courts.
- Outdoor Balls: Usually made with more durable rubber or synthetic materials, outdoor balls are built to withstand abrasive surfaces. While the recommended PSI basketball range is generally the same, their construction might make them slightly more forgiving if they are a touch over or under-inflated. However, maintaining the 7-9 PSI range will still provide the best playing experience.
Different Sizes of Basketballs
Basketballs come in various sizes for different age groups and genders:
- Size 7 (Official Size): Used in men’s professional and college basketball. This is the standard for the 7-9 PSI rule.
- Size 6 (Women’s/Youth Size): Used in women’s professional and college basketball, as well as for older youth players. The basketball pressure recommendations are typically the same as Size 7.
- Size 5 (Youth Size): Used for younger players. Again, the general 7-9 PSI range applies, ensuring a manageable bounce and feel for developing players.
The key is that regardless of size, the PSI level for basketball is designed to create a specific rebound characteristic that is consistent across all official sizes, within the 7-9 PSI window.
Frequently Asked Questions (FAQ)
Q1: What is the ideal PSI for a basketball?
A1: The ideal PSI for most basketballs is between 7 and 9 PSI.
Q2: Can I use a bicycle pump to inflate a basketball?
A2: Yes, you can use a bicycle pump, but make sure you have a proper basketball needle attachment for it.
Q3: How do I know if my basketball is over-inflated?
A3: An over-inflated basketball will feel very hard, will bounce excessively high when dropped, and may be uncomfortable to grip.
Q4: How do I know if my basketball is under-inflated?
A4: An under-inflated basketball will feel soft, will not bounce well, and will feel “dead” or sluggish during play.
Q5: Does temperature affect basketball pressure?
A5: Yes, temperature affects air pressure. Basketballs lose pressure in cold weather and gain pressure in warm weather.
Q6: Where can I find a basketball pressure gauge?
A6: You can find basketball pressure gauges at sporting goods stores, online retailers, and sometimes at general merchandise stores.
Q7: What happens if I over-inflate my basketball?
A7: Over-inflating can stress the seams and bladder, potentially leading to damage, and it makes the ball too hard and bouncy for proper play.
Q8: Should I check the pressure before or after playing?
A8: It’s best to check the pressure before playing to ensure optimal performance and safety. Checking periodically during breaks is also a good idea.
By following this comprehensive basketball inflation guide, you can ensure your basketball is always ready for action, providing the best possible basketball game pressure for an enjoyable and safe experience on the court. Proper maintenance, including checking the basketball air pressure, is crucial for the longevity and performance of your ball.