
Can you paint basketball lines on concrete yourself? Yes, you absolutely can! This guide will walk you through everything you need to know to create your own DIY basketball court with crisp, clear concrete court lines. Whether you’re giving an old outdoor basketball court a new lease on life or building a new one from scratch, marking basketball lines correctly is key to a functional and enjoyable playing space. This process can feel daunting, but with the right preparation and materials, it’s a rewarding project that can transform your driveway or yard into a place for fun and games. We’ll cover selecting the right paint for concrete, using basketball court stencil kits, and achieving a professional look for your basketball court refresher.
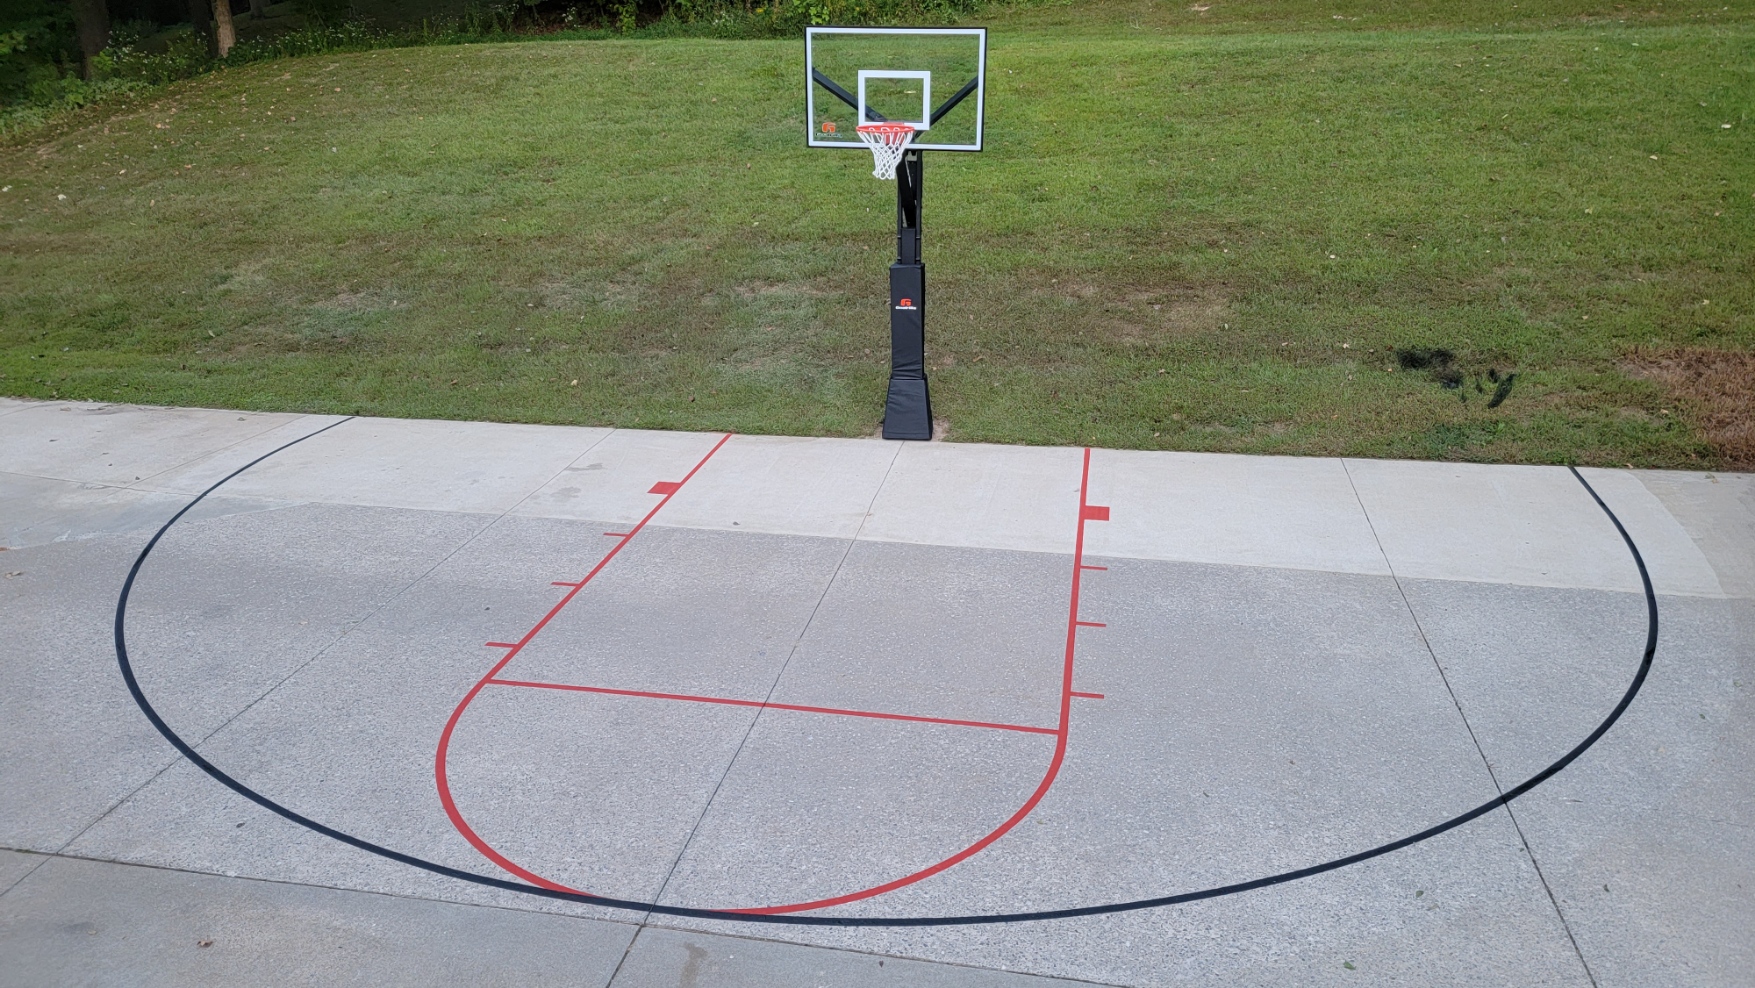
Image Source: preciseassemblies.com
Planning Your Basketball Court Layout
Before you even think about picking up a paintbrush, careful planning is essential. A regulation basketball court has specific dimensions, but for a backyard setup, you have flexibility. However, knowing the standard measurements will help you create a more authentic experience.
Standard Basketball Court Dimensions
A full NBA-regulation court is 94 feet long and 50 feet wide. For a driveway or smaller space, you’ll need to scale these down. A common size for residential courts is around 50 feet long by 30 feet wide.
- Length: The distance from baseline to baseline.
- Width: The distance from sideline to sideline.
- Key (The “Paint”): This is the rectangular area under the basket. It’s 16 feet wide at the baseline and extends 19 feet into the court.
- Free-Throw Line: Located 15 feet from the face of the backboard, centered on the key.
- Three-Point Line: This varies by league. NBA courts have a 23-foot, 9-inch arc from the basket center. High school courts are closer at 19 feet, 9 inches. Choose a distance that suits your space.
- Center Circle: Has a 6-foot radius.
Adapting to Your Space
Consider the size and shape of your existing concrete area. You might not have room for a full-sized court. Measure your space carefully.
Measuring and Marking Key Areas
- Center Point: Find the center of your playing area. This is crucial for drawing circles and arcs.
- Baselines and Sidelines: Mark out the outer boundaries of your court. Use chalk or temporary spray paint for this. Ensure they are as square and parallel as possible.
- Key and Free-Throw Line: Measure and mark these important areas relative to your basket placement.
- Three-Point Line: Decide on your desired radius and mark this arc.
Tip: Use a long measuring tape and ensure all angles are as close to 90 degrees as possible. A carpenter’s square can be helpful.
Choosing the Right Paint for Concrete
The type of paint you use is critical for durability and appearance. Not all paints are created equal, especially when it comes to withstanding foot traffic, weather, and the elements. You need a specialized sports court marking paint.
Types of Paint
- Acrylic Latex Concrete Paint: This is a common choice for driveways and patios. It’s water-based, easy to clean up, and available in many colors. For a basketball court, you’ll want a high-quality, durable version.
- Epoxy Concrete Paint: More expensive but much tougher. Epoxy provides a very hard, durable finish that resists abrasion and chemicals. It’s a great option for high-traffic areas.
- Urethane Concrete Paint: Offers excellent durability and UV resistance. It’s often used in commercial settings for its longevity.
Specific Basketball Court Paint
Look for products labeled as basketball court paint or sports court marking paint. These are specifically formulated for outdoor use on concrete or asphalt. They are designed to be:
- Durable: Withstand wear and tear from shoes, balls, and weather.
- Fade-Resistant: Maintain color under sunlight.
- Adhesive: Bond well to concrete surfaces.
- Non-Slip: Often contain additives for traction.
Comparing Paint Types
| Paint Type | Durability | UV Resistance | Ease of Application | Cost | Best For |
|---|---|---|---|---|---|
| Acrylic Latex Concrete | Good | Moderate | Easy | Moderate | Driveways, patios, light-duty courts |
| Epoxy Concrete Paint | Excellent | Good | Moderate (can be tricky) | Higher | High-traffic courts, long-lasting results |
| Urethane Concrete Paint | Excellent | Excellent | Moderate | Highest | Professional courts, extreme durability |
Important Note: If your concrete is new, allow it to cure for at least 28 days before painting.
Preparing the Concrete Surface
This is arguably the most crucial step. Proper preparation ensures the paint adheres well and lasts longer. Neglecting this can lead to peeling or flaking paint.
Cleaning the Surface
The concrete must be free of all dirt, dust, grease, oil, and debris.
- Sweep: Thoroughly sweep the entire area.
- Wash: Use a pressure washer or a stiff brush and a strong degreaser or concrete cleaner. Pay attention to any oil stains.
- Rinse: Rinse the surface thoroughly with clean water.
- Dry: Allow the concrete to dry completely. This can take 24-48 hours depending on the weather.
Repairing Cracks and Imperfections
Fill any cracks or holes before painting.
- Cracks: Use a concrete crack filler or sealant. For wider cracks, you might need a concrete repair caulk.
- Holes/Pits: Use a concrete patching compound.
Follow the product instructions for application and drying times. Once repairs are dry, lightly sand down any raised areas.
Etching (Optional but Recommended)
Etching creates a slightly rougher surface for better paint adhesion.
- Acid Etching: Use a solution of muriatic acid (diluted per instructions) and water. Be extremely careful when handling acid – wear gloves, eye protection, and protective clothing. Apply the acid solution, let it bubble for a few minutes, then scrub with a stiff brush. Rinse thoroughly and allow to dry completely.
- Mechanical Etching: Using a scarifier or grinder with a diamond cup wheel can also prepare the surface. This is more labor-intensive but often provides superior adhesion.
Safety First: If using acid, always add acid to water, never water to acid. Ensure good ventilation and wear appropriate safety gear.
Painting the Basketball Lines
With the surface prepared, it’s time to start painting! You have a few options for achieving those clean lines.
Using a Basketball Court Stencil
A basketball court stencil is the easiest way to get professional-looking lines. These are typically made from durable plastic or cardboard.
Types of Stencils
- Pre-cut Sets: These kits include all the lines needed for a court (boundary lines, key, free-throw line, etc.). They are often reusable.
- Individual Stencils: You can buy stencils for specific elements like numbers or logos.
How to Use Stencils
- Positioning: Lay out the stencils according to your planned court layout. Use painter’s tape or spray adhesive to hold them securely in place. Ensure they are perfectly aligned.
- Taping: Tape off the edges of the stencil where it meets the concrete to prevent paint bleed. Use high-quality painter’s tape.
- Painting:
- Spray Paint: For smaller areas or touch-ups, spray paint can work well. Apply light, even coats.
- Roller: Use a short-nap roller for a smooth finish. Dip the roller lightly and avoid overloading it.
- Brush: A good quality brush is useful for edges and corners.
- Multiple Coats: Apply thin, even coats. Allow each coat to dry slightly before applying the next. This prevents drips and ensures good coverage.
- Removal: Carefully remove the stencil while the last coat of paint is still slightly wet. This helps prevent the paint from peeling up with the stencil. If paint has seeped under the stencil, you can carefully scrape it away with a putty knife while wet.
Freehand Painting
If you don’t have stencils or want a custom look, you can paint freehand. This requires more precision.
Tools for Freehand Painting
- Chalk or Temporary Spray Paint: To mark your lines accurately before painting.
- Measuring Tape and String: For drawing straight lines and arcs.
- High-Quality Painter’s Tape: Essential for creating crisp, straight edges.
- Paint Rollers and Brushes: Various sizes for different line widths.
- Paint Tray: For your chosen basketball court paint.
Freehand Process
- Layout: Measure and mark your court lines precisely with chalk or temporary spray paint.
- Tape the Lines: Carefully apply painter’s tape along the edge of your chalk lines. Press the tape down firmly to ensure a good seal. You can use a utility knife to trim tape for curves.
- Paint Application:
- Edges: Use a brush to apply paint along the taped edges.
- Fill: Use a roller to fill in the rest of the line. Avoid applying too much paint, which can cause it to seep under the tape.
- Multiple Coats: Apply thin, even coats, allowing drying time between each.
- Tape Removal: Remove the painter’s tape immediately after applying the final coat of paint. Pull it off at a 45-degree angle to minimize the risk of peeling.
Tip: For the center circle and free-throw lane arcs, you can create a makeshift compass by tying a string to a can of paint or a marker, anchoring it at the center point, and drawing the arc.
Choosing Your Colors
While traditional basketball courts use white lines, you can get creative!
- White: The classic choice, offering high visibility.
- Blue: Often used for the key area in professional courts.
- Red: Can be used for the free-throw lane or special markings.
- Green or other colors: For boundary lines or decorative elements.
When choosing colors, ensure they provide good contrast against the main court surface color (if you decide to paint the entire court).
Painting the Entire Court Surface (Optional)
If you’re looking for a complete basketball court refresher, you might want to paint the entire surface.
- Prime: Consider using a concrete primer for better adhesion and to ensure a uniform base color.
- Main Color: Apply your chosen base color (often a light grey, blue, or green) using rollers or a sprayer. You’ll likely need two coats.
- Allow to Cure: Let the base coat cure completely according to the paint manufacturer’s instructions before marking basketball lines. This is crucial for preventing the line paint from peeling up the base coat.
Using Asphalt Court Paint
If your court surface is asphalt, you’ll need specific asphalt court paint. Asphalt requires a different formulation than concrete.
- Asphalt Sealers: Often, a good quality asphalt sealer is applied first to create a uniform, stable surface.
- Asphalt Paint: Look for paints designed for asphalt, which are formulated to be flexible and withstand the oils and binders present in asphalt.
The preparation steps are similar: clean thoroughly, repair cracks, and ensure the surface is dry.
Drying and Curing Times
Patience is key.
- Drying: Most paints will be dry to the touch within a few hours.
- Curing: Curing is the process where the paint hardens and reaches its maximum durability. This can take several days to a week or more, depending on the paint type and weather conditions.
Avoid walking or driving on the court until it is fully cured to prevent damage.
Maintenance and Longevity
Proper maintenance will extend the life of your painted lines.
- Regular Cleaning: Sweep the court regularly to remove debris. Wash with mild soap and water as needed.
- Avoid Harsh Chemicals: Do not use strong solvents or degreasers directly on the painted lines, as they can damage the paint.
- Touch-Ups: Address any chips or wear spots promptly with touch-up paint.
- Reapplication: Depending on traffic and weather, you may need to reapply paint every 1-3 years as part of your basketball court refresher plan.
Frequently Asked Questions (FAQ)
Q1: What is the best paint to use for basketball lines on concrete?
A1: The best paint is a high-quality, durable acrylic latex concrete paint specifically designed for outdoor sports courts or a specialized basketball court paint. For maximum durability, epoxy or urethane coatings are excellent options.
Q2: Can I paint basketball lines on my driveway?
A2: Yes, you can paint basketball lines on a driveway as long as it’s concrete or asphalt. Proper preparation is key for a lasting finish.
Q3: How wide should basketball court lines be?
A3: Standard line widths are usually 2 inches for boundary lines and 4 inches for the key and free-throw lane. Some prefer 4-inch lines for all markings for better visibility.
Q4: How long will the painted lines last?
A4: Durability depends on the paint quality, preparation, traffic, and weather. A well-done job using quality paint for concrete can last anywhere from 1 to 5 years before needing a touch-up or recoating.
Q5: Do I need a stencil to paint basketball lines?
A5: While a basketball court stencil makes the process easier and more precise, especially for beginners, you can achieve professional results by carefully taping and painting freehand.
Q6: What temperature is best for painting concrete?
A6: Most paints recommend application temperatures between 50°F and 85°F (10°C and 30°C). Avoid painting in direct sunlight, extreme heat, or when rain is expected.
Q7: Can I paint over old basketball court lines?
A7: Yes, you can paint over old lines, but proper preparation is vital. Clean the surface thoroughly, and if the old lines are peeling or uneven, you may need to scrape or sand them down before applying new paint.
By following these steps, you can successfully transform your concrete surface into a functional and visually appealing basketball court, ready for countless hours of play.