
Can you draw a basketball? Yes, drawing a basketball is a fun and achievable skill for anyone, regardless of their artistic experience. This basketball drawing tutorial is designed to be incredibly straightforward, guiding you through sketching a basketball with simple steps. Whether you’re a complete novice or looking to refine your skills, this guide on drawing a basketball for beginners will have you creating realistic-looking basketballs in no time. We’ll cover everything from the basic shape to adding those signature lines and shading.
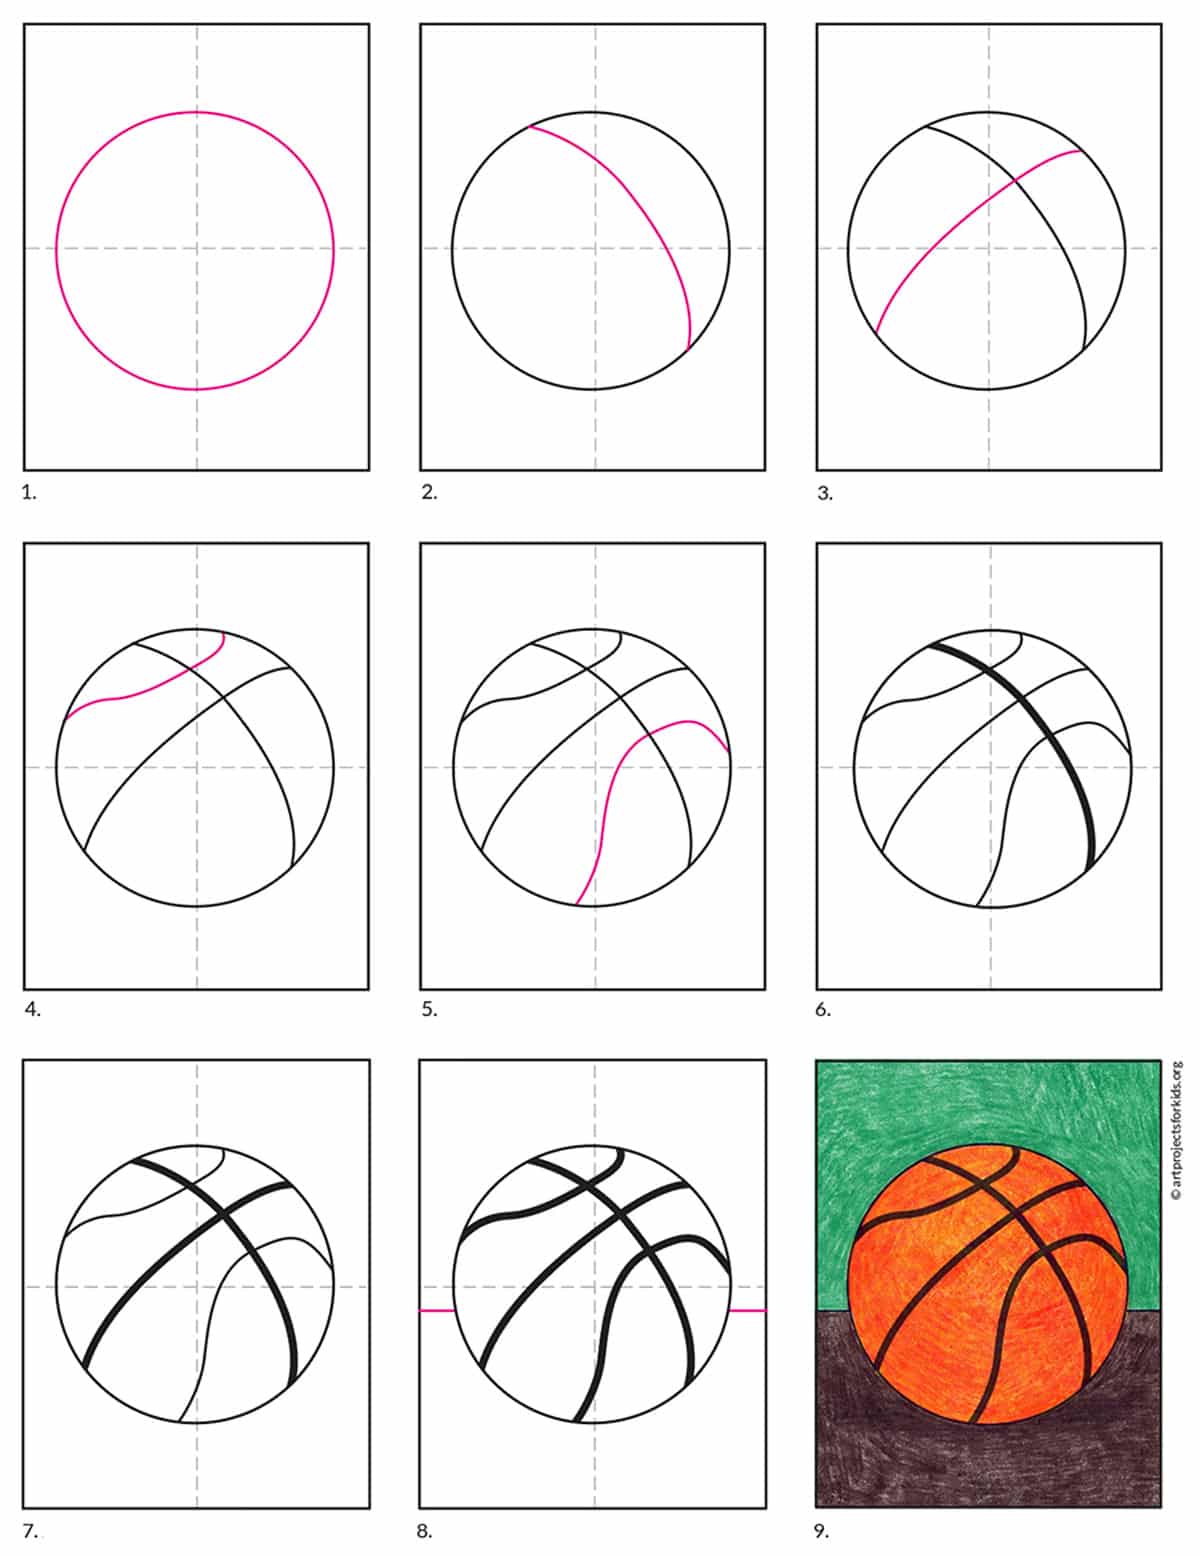
Image Source: artprojectsforkids.org
The Basics of Drawing a Sports Ball
Before we dive into the specifics of a basketball, let’s touch upon a few fundamental principles of drawing a sports ball. Most spherical objects share common drawing elements: a clean circular outline, shading to create the illusion of a sphere, and details specific to the object. For a basketball, these details include the distinct lines that divide the panels and the texture of its surface.
Getting Started: Your Basketball Art Tutorial
This basketball art tutorial is broken down into simple, manageable steps. Grab your pencil and paper – let’s begin this easy basketball drawing adventure! We’ll focus on making this a smooth step by step ball drawing process. This is great for drawing practice basketball sessions.
Materials You’ll Need
- Pencil: A standard HB pencil is perfect. You might also want a softer lead (like a 2B) for darker shading later.
- Paper: Any drawing paper will do.
- Eraser: A good quality eraser is essential for correcting any mistakes.
- Optional: A ruler or a circular object to trace if you want a perfectly round ball initially, though freehand is great for practice.
Step 1: Sketching the Basic Circle
This is where we start our basic basketball sketch. The first step to how to illustrate a basketball is creating its fundamental shape.
- Draw a Circle: Lightly sketch a circle on your paper. Don’t worry if it’s not perfectly round. The beauty of sketching is that you can refine it.
- Tip for Roundness: If freehand is tricky, lightly trace around a round object like a cup or a jar. Then, draw your circle inside that traced shape. This gives you a guideline.
- Refine the Circle: Once you have your initial circle, look at it. Are there any bumpy bits? Gently erase and redraw to make it smoother. You want a clean, continuous line. This is your starting point for drawing a sports ball.
Step 2: Adding the Panel Lines
Basketballs are made of distinct panels. These lines give the ball its recognizable look.
- The Center Line: Lightly draw a vertical line that goes straight down the center of your circle, dividing it into two halves.
- The Horizontal Line: Now, draw a horizontal line that goes across the widest part of the circle, intersecting the vertical line. This line should be slightly curved, following the contour of the ball.
Adding More Curves:
- On each side of the vertical line, draw two curved lines that mimic the horizontal line. These should bulge slightly outwards. Think of them as fitting into the gaps of the horizontal line.
- Now, draw two curved lines that run vertically, connecting the top and bottom of the circle, curving around the sides. These lines will be a bit shorter than the horizontal ones.
The goal is to create a pattern of curved lines that resemble the panels of a real basketball. Imagine slicing an orange into segments; the lines on a basketball are similar, though more geometrically arranged.
Visual Aid:
| Line Type | Description |
| :———— | :———————————————— |
| Vertical | Straight line down the middle. |
| Horizontal | Curved line across the widest part. |
| Side Curves | Two curves on each side of the vertical line. |
| Vertical Sides | Two shorter curves connecting top and bottom edges. |
Refining Panel Lines: Look at a picture of a basketball. Notice how the lines aren’t perfectly straight and uniform. They are slightly curved and meet at points. Gently adjust your lines to be more natural and to connect smoothly where they should. Erase any awkward intersections. This part of the basketball drawing tutorial is crucial for realism.
Step 3: Creating the Illusion of a Sphere (Shading)
This is where your drawing starts to look round and three-dimensional. This step is key for making your sketching a basketball look realistic.
- Identify the Light Source: Imagine where the light is coming from. Is it from the top left? Top right? This will determine where the highlights and shadows fall. For this tutorial, let’s assume the light is coming from the top left.
- Add Highlights: On the part of the ball closest to your imagined light source (the top left), leave a small area without shading, or make it very light. This is your highlight. It’s the brightest spot.
- Gentle Shading: Start applying light, even shading on the side opposite the highlight (the bottom right). Use your pencil and make smooth, light strokes. Follow the curve of the ball.
- Tip for Smooth Shading: You can use the side of your pencil lead for broader strokes. Try to make your strokes follow the curvature of the ball.
- Building Up Darker Tones: Gradually add more layers of shading as you move away from the highlight. The darkest areas will be on the side furthest from the light.
- Panel Shading: Pay attention to the panel lines. The shading will often be darker just below a panel line on the curved surface.
- Edge Shading: The edges of the ball that curve away from the viewer will also be darker. This helps to “round out” the ball.
- Blending: You can use a blending tool, a tortillon, a cotton swab, or even your fingertip (be gentle!) to smooth out the shading. This creates a softer, more graduated tone, which is essential for drawing a basketball for beginners. Be careful not to over-blend, as you want to retain some texture.
Step 4: Adding Texture and Detail
Real basketballs have a pebbled texture. We can suggest this with our drawing.
- Tiny Dots: On the shaded areas, you can lightly add tiny dots or very small, irregular marks. Don’t overdo this; you just want to hint at the texture. This is particularly effective on the darker shaded areas.
- Refining Panel Lines: Now, go back to your panel lines. Make them slightly darker and more defined, especially where the shading is. The contrast between the lines and the shaded areas will make them pop.
- Highlight Polish: If you blended over your highlight, gently erase to bring back its brightness. Sometimes, adding a tiny, sharp highlight can make the ball look even shinier.
Step 5: Final Touches and Refinements
This is the stage for perfecting your easy basketball drawing.
- Check Proportions: Step back and look at your drawing. Do the panel lines look balanced? Is the shading consistent with your imagined light source?
- Shadow Under the Ball: To make the basketball look like it’s resting on a surface, add a soft shadow directly underneath it. The shadow should be darkest right under the ball and fade out as it gets further away. This is a common technique in drawing practice basketball.
- Adjust Contrast: If needed, deepen your shadows or lighten your highlights to increase the contrast and make the ball look more vibrant. This is an important part of learning how to illustrate a basketball.
Drawing Variations and Tips
Drawing a Basketball in Motion
To make your basketball look like it’s in motion, you can:
- Slightly Distort the Circle: Make the circle a bit oval-shaped, as if it’s being squeezed.
- Add Motion Lines: Draw short, curved lines behind the ball to suggest movement.
- Emphasize Spin: Use curved shading that follows the direction of spin.
Using Different Shading Techniques
- Hatching: Using parallel lines to create tone. Closer lines mean darker areas.
- Cross-hatching: Layering lines in different directions to build up darker tones.
- Stippling: Using dots to create shading. This is great for subtle texture.
Why Practice Your Sketching a Basketball?
Practicing drawing a basketball helps in several ways:
- Improves Circle Drawing: It’s excellent practice for drawing smooth, consistent circles freehand.
- Develops Shading Skills: Learning to create the illusion of a sphere through shading is a fundamental art skill.
- Enhances Observation: You’ll start to notice the details of round objects in real life.
- Builds Confidence: Completing a drawing, even a simple one, boosts your artistic confidence.
Common Challenges and How to Overcome Them
| Challenge | Solution |
|---|---|
| Ball isn’t perfectly round. | Use a tracing guide initially or practice freehand circles regularly. Refine with eraser. |
| Shading looks flat. | Make sure you have a clear light source. Build up shading gradually with layers. |
| Panel lines are uneven. | Use very light guide lines first. Refer to a real basketball image frequently. |
| Texture looks too heavy. | Use very light, small dots or lines. Apply them only in shaded areas. |
| Highlights are lost in shading. | Be careful when shading. Use a precise eraser to lift graphite and restore brightness. |
Frequently Asked Questions (FAQ)
Q1: What’s the best way to get a perfectly round basketball?
While perfectly round isn’t always necessary for a dynamic drawing, for a precise circle, use a compass, trace a round object, or use a digital drawing tool’s circle function. For freehand practice, draw lightly and use your eraser to refine the shape.
Q2: How do I make the shading look smooth without smudging?
Use a blending tool like a tortillon or blending stump. Alternatively, use a very soft pencil (like 6B) and apply light pressure for smooth coverage. You can also use a soft brush for blending.
Q3: Can I draw a basketball without shading?
Yes, you can create a line drawing of a basketball, focusing on the panel lines and the circular shape. However, shading adds depth and realism, making it appear more three-dimensional.
Q4: What kind of pencil should I use for drawing a basketball?
An HB pencil is good for sketching. For shading, a 2B or 4B pencil will give you darker tones without needing too much pressure, helping to avoid paper damage and achieving smoother gradients.
Q5: How do I draw a basketball with seams instead of panels?
Basketballs have panels that are connected by seams. The lines we drew in Step 2 represent these seams. The curved nature of these lines is key to making it look like a sphere.
Q6: How long does it take to learn to draw a basketball well?
With consistent drawing practice basketball, you can get comfortable drawing a basic basketball within an hour. Achieving a highly realistic look might take many practice sessions, as you hone your shading and detail skills.
Q7: What are the common mistakes beginners make when drawing a basketball?
- Making the circle too perfectly round, which can look artificial.
- Drawing panel lines too straight or too uniform.
- Not enough contrast in shading, making the ball look flat.
- Over-blending, which can create muddy shadows.
- Forgetting to consider the light source when shading.
Conclusion: Mastering Your Basketball Art
You’ve now learned how to draw a basketball step by step! This basketball drawing tutorial provides a clear path for creating your own realistic basketballs. Remember, practice makes perfect. Keep working on your sketching a basketball skills, experiment with different shading techniques, and don’t be afraid to add your own flair. Whether you’re creating sports illustrations or just enjoying the process of drawing a sports ball, you’ve taken a significant step in your artistic journey. Happy drawing!