
What is the standard height of a basketball hoop? For regulation play, the basketball rim height is 10 feet from the court surface. This guide will help you measure your basketball hoop and ensure it meets your needs, whether for casual play, official games, or precise installation.
Measuring a basketball hoop might seem straightforward, but knowing the exact dimensions is crucial for proper setup, performance, and adhering to official standards. Whether you’re looking to install a new hoop, adjust an existing one, or simply understand the components of your setup, this comprehensive guide will walk you through every measurement you need to take.
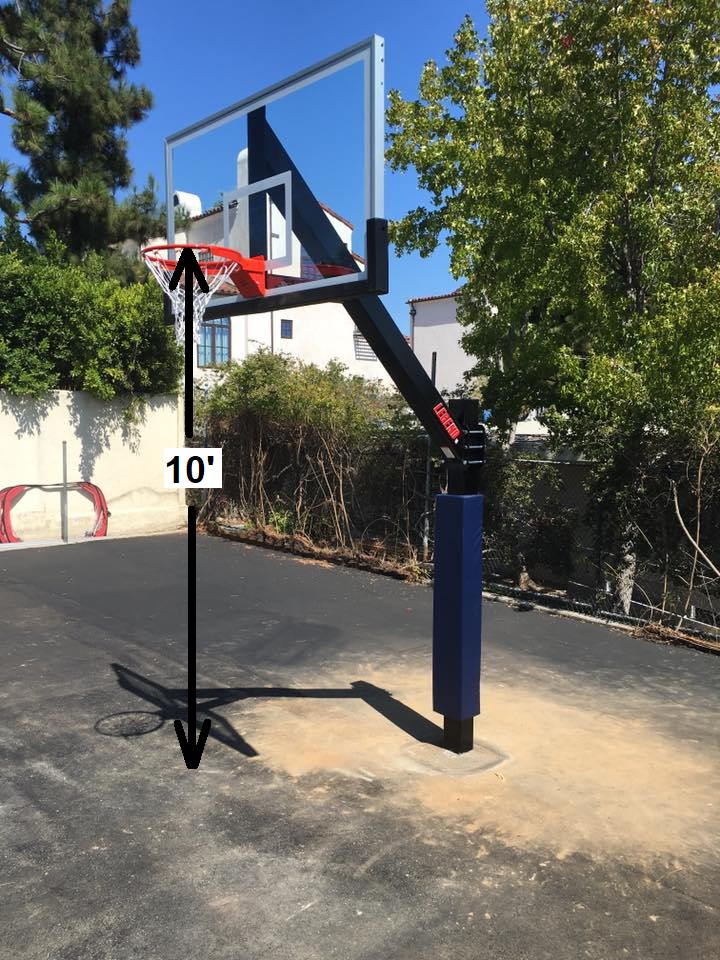
Image Source: www.firstteaminc.com
The Core Measurements: Rim and Backboard
The heart of any basketball hoop system lies in its rim and backboard. Getting these measurements right is fundamental to an accurate and enjoyable playing experience.
Rim Diameter: The Hoop Itself
The basketball hoop diameter is a critical measurement. For standard, regulation hoops, the inner diameter is 18 inches. This measurement is consistent across most adult and professional play.
- What to measure: The inside edge of the rim, from one side to the other.
- Tools needed: A measuring tape.
- Procedure: Place the end of your measuring tape at the inner edge of the rim on one side and extend it across to the inner edge on the opposite side. Ensure the tape is pulled taut.
Why is this diameter important? It dictates the bounce and trajectory of the ball. A rim that’s too small can lead to frustrating misses, while one that’s too large might feel like shooting at a barn door.
Backboard Dimensions: The Target
The measuring backboard dimensions involves two key aspects: its size and its positioning relative to the rim. Backboards come in various sizes, from compact residential units to full-sized professional boards.
Backboard Size: Width and Height
Regulation backboards typically measure 72 inches wide by 42 inches high for professional and collegiate play. High school and youth leagues may use slightly smaller dimensions.
- What to measure: The total width and height of the backboard panel itself.
- Tools needed: A measuring tape.
- Procedure:
- Width: Measure horizontally across the widest part of the backboard.
- Height: Measure vertically from the bottom edge to the top edge of the backboard.
Backboard Offset: Distance from the Post
The offset is the distance from the front face of the backboard to the center of the rim. This measurement is important for simulating the feel of official courts and ensuring proper player clearance.
- What to measure: The distance from the plane of the backboard to the center point of the rim.
- Tools needed: A measuring tape or a straight edge and a measuring tape.
Procedure:
- Place a straight edge (like a level or another piece of wood) against the front of the backboard, ensuring it’s flat.
- Measure the horizontal distance from this straight edge to the center of the rim.
Regulation Offset: For NBA and NCAA courts, the backboard offset is typically 4 feet (48 inches). For most residential installations, this offset may be less, often between 10 to 30 inches, depending on the hoop model and mounting.
Setting the Standard: Basketball Rim Height
The basketball rim height is the most critical measurement for gameplay. As mentioned, the official height is 10 feet from the playing surface to the top of the rim. This applies to professional, collegiate, and most high school competitions.
Adjusting Basketball Hoop Height
For many home and recreational hoop systems, the ability to adjust the adjusting basketball hoop height is a key feature. This allows for different age groups and skill levels to play.
- Adjustable Systems: These typically use a crank mechanism, a pin-and-hole system, or hydraulic assistance.
- Crank Mechanisms: Measure the distance from the ground to the rim. Turn the crank to raise or lower the rim. Note the number of turns it takes to change the height by a specific increment (e.g., one foot) to calibrate your adjustments.
- Pin-and-Hole Systems: Identify the pin that secures the pole sections at different heights. Count the holes on the pole or consult your manual to determine the height associated with each hole.
- Fixed Systems: These hoops are set at a specific height during installation and cannot be easily adjusted.
Wall-Mounted Basketball Hoop Height
For wall-mounted basketball hoop height, the measurement principle remains the same: 10 feet from the playing surface. However, the installation method changes the process of ensuring this height.
- Measurement: You’ll still measure from the finished court surface (concrete, asphalt, driveway) to the top of the rim.
- Installation Consideration: When mounting to a wall (like a garage or shed), you’ll need to ensure the wall is structurally sound and that the mounting bracket is installed at the correct elevation. Use a reliable level and measuring tape to mark the desired height before drilling.
Hoop Installation Measurements
Knowing how to measure is essential, but so is knowing how to measure during the how to install a basketball hoop process. This ensures everything is correctly positioned from the start.
Measuring Basketball Hoop Pole
For in-ground and portable hoops, the pole is the backbone of the system. The key measurements here relate to its stability and height adjustment.
Pole Diameter: This affects the strength and stability of the hoop. It’s usually specified by the manufacturer and can range from 3 inches for lighter residential systems to 5 inches or more for heavy-duty models.
- What to measure: The diameter of the pole itself.
- Tools needed: Measuring tape.
- Procedure: Wrap the measuring tape around the circumference of the pole and divide by pi (approximately 3.14) to get the diameter. Alternatively, if the pole is square, measure the width of one side.
Pole Length: The total length of the pole determines the maximum height the hoop can be set at and how deep it needs to be buried for stability.
- What to measure: The total length of the pole section(s).
- Tools needed: Measuring tape.
- Procedure: Measure from the very bottom of the pole to the top where the backboard/rim assembly attaches.
In-Ground Basketball Hoop Installation
In-ground basketball hoop installation requires careful measurement of the pole placement and depth.
Hole Depth: The general rule of thumb is to bury the pole to at least 1/3 of its total length for stability, but consult your manufacturer’s instructions as this can vary. A typical depth for a 10-foot hoop might be 2 to 3 feet.
- What to measure: The depth of the hole dug for the pole.
- Tools needed: Measuring tape.
- Procedure: Use the measuring tape to ensure the hole meets the required depth before setting the pole.
Pole Straightness: Use a level to ensure the pole is perfectly vertical (plumb) before the concrete sets.
- What to measure: Verticality.
- Tools needed: Level.
- Procedure: Place the level against the pole on two adjacent sides. Adjust the pole until the bubble is centered in both instances.
Portable Basketball Hoop Measurements
Portable basketball hoop measurements primarily involve the base and the overall dimensions when set up.
- Base Dimensions: The size of the base, often filled with water or sand, is crucial for stability. Measure the length and width of the base unit.
- Wheeled Base Clearance: If your portable hoop has wheels, ensure there’s enough clearance to move it easily.
- Overall Height: Measure the total height from the ground to the top of the rim.
- Reach/Overhang: This is the distance from the front of the backboard to the front of the rim. It affects how close players can get to the basket without hitting the backboard support.
- What to measure: The distance from the front plane of the backboard to the center of the rim.
- Tools needed: Measuring tape.
- Procedure: Measure horizontally from the backboard’s front surface to the center of the rim.
Basketball Hoop Regulations: Official vs. Recreational
Basketball hoop regulations are essential for serious players and organized leagues. While residential hoops often mimic these, there can be slight variations.
Regulation Specifications Summary
| Component | Regulation Measurement (NBA/NCAA) | Typical Recreational Measurement |
|---|---|---|
| Rim Height | 10 feet | 7.5 ft to 10 ft (adjustable) |
| Rim Diameter | 18 inches (inner) | 18 inches (inner) |
| Backboard Width | 72 inches | 44 inches to 72 inches |
| Backboard Height | 42 inches | 30 inches to 42 inches |
| Backboard Offset | 4 feet (48 inches) | 10 inches to 30 inches |
Note: High school and youth leagues may have slightly different backboard size regulations. Always check the specific rules for the league you are playing in.
Backboard Material and Transparency
While not a measurement, the material of the backboard (acrylic, polycarbonate, glass, or wood) affects play. Regulations often specify tempered glass for professional play due to its superior rebound characteristics. For home use, acrylic or polycarbonate are common and durable alternatives.
Measuring for Different Hoop Types
The method of measurement can vary slightly depending on the type of basketball hoop you have.
Measuring for a Pole-Mounted Hoop (In-Ground)
When you have an in-ground hoop, the pole is the central element to consider.
Measuring Existing In-Ground Hoop Height
- Locate the Rim: Identify the center of the basketball rim.
- Measure to the Ground: Use a measuring tape to measure the vertical distance from the top of the rim down to the playing surface.
- Check for Level: Ensure the playing surface is level where you are measuring.
Measuring for a New In-Ground Hoop Installation
- Determine Desired Height: Decide on the basketball rim height (10 feet for regulation, or lower for younger players).
- Select Hoop System: Choose a system that allows for your desired height and offers adjustability if needed.
- Measure Pole Length: Confirm the pole’s total length and how much will be buried.
- Calculate Hole Depth: Refer to the manufacturer’s guide for recommended hole depth based on pole length and hoop weight.
- Mark Position: Use stakes and string to mark the center of where the pole will be installed, ensuring it’s perpendicular to the intended playing area.
Measuring for a Portable Basketball Hoop
Portability adds different considerations to your measurements.
Measuring Existing Portable Hoop
- Rim Height: Measure from the ground to the top of the rim.
- Base Stability: Check if the base is level and adequately filled for stability. Measure the dimensions of the filled base.
- Portability: Note the dimensions of the base and the overall height to ensure it can pass through doorways or be moved to your desired location.
Measuring for a New Portable Hoop Purchase
- Height Range: Check the adjustable height range advertised by the manufacturer.
- Base Volume: Consider the volume of the base (gallons or cubic feet) to estimate how much water or sand you’ll need for stability.
- Footprint: Measure the dimensions of the base and the extended backboard to ensure it fits your intended space.
- Overhang: Look at the “reach” or overhang measurement to see how much space there is between the backboard and the rim.
Measuring for a Wall-Mounted Hoop
Wall-mounted hoops require careful measurement of the mounting location.
Measuring Existing Wall-Mounted Hoop
- Rim Height: Measure from the playing surface directly below the hoop to the top of the rim.
- Backboard Position: Check the distance from the wall to the rim (offset).
- Wall Clearance: Ensure the backboard doesn’t extend too far out from the wall, obstructing play.
Measuring for a New Wall-Mounted Hoop Installation
- Choose Mounting Location: Select a sturdy wall (e.g., garage, shed) that can support the forces generated by gameplay.
- Mark Rim Height: Use a level and measuring tape to mark the exact 10-foot (or desired) basketball rim height on the wall.
- Determine Backboard Offset: Decide on the desired offset. A larger offset provides more room to play under the basket.
- Measure Bracket Placement: Mark the locations for the mounting brackets based on the hoop manufacturer’s specifications, ensuring they align with wall studs or provide secure anchoring.
Tools for Accurate Measurement
Having the right tools makes all the difference when you’re measuring your basketball hoop.
- Measuring Tape: A standard retractable metal measuring tape (25-foot or longer is ideal) is essential.
- Level: A spirit level or laser level is crucial for ensuring poles and backboards are plumb and square.
- Straight Edge: A long, straight piece of wood or metal can help create a consistent line for measuring offsets against backboards.
- Marker or Chalk: For marking points on poles or backboards.
- Calculator: For calculating circumferences to diameters (if needed) or for verifying heights on adjustable systems.
Frequently Asked Questions (FAQ)
Q1: What is the standard basketball rim height for a driveway hoop?
A1: For a driveway hoop intended for general play and mimicking regulation, the standard basketball rim height is 10 feet. However, many driveway hoops are adjustable, allowing you to lower the rim for younger players, typically as low as 7.5 feet.
Q2: Can I adjust the height of any basketball hoop?
A2: No, not all basketball hoops are adjustable. Fixed-height hoops are common in some older or very basic models. Most modern residential hoops, especially in-ground and many portable ones, are designed with adjustable height features. Always check the product specifications before purchasing if adjustability is important.
Q3: Who determines the basketball hoop regulations?
A3: Basketball hoop regulations are set by various sporting bodies. For professional play, organizations like the NBA and FIBA establish the official dimensions and heights. For collegiate and high school play in the US, the NCAA and NFHS (National Federation of State High School Associations) set the standards.
Q4: How do I ensure my in-ground hoop is stable?
A4: Proper in-ground basketball hoop installation is key to stability. This involves digging the hole to the correct depth (usually at least one-third of the pole’s length), using the recommended amount and type of concrete, and ensuring the pole is perfectly plumb before the concrete sets. Regular maintenance, like checking for rust or loose bolts, also contributes to long-term stability.
Q5: What’s the difference between basketball rim diameter and hoop diameter?
A5: In the context of basketball, the terms basketball hoop diameter and rim diameter are generally used interchangeably to refer to the inner diameter of the rim, which is 18 inches for regulation hoops.
Q6: How do I measure the backboard offset for my portable hoop?
A6: To measure the backboard offset for a portable basketball hoop measurements, you need to determine the distance from the front surface of the backboard to the center of the rim. Use a measuring tape and a straight edge placed against the backboard for accuracy. This measurement is important for understanding player clearance and the feel of the game.
Q7: My hoop seems too high or too low. How do I check and adjust the basketball rim height?
A7: To check the basketball rim height, measure vertically from the playing surface to the top edge of the rim. If your hoop is adjustable, consult its manual for instructions on adjusting basketball hoop height. This usually involves a crank, a pin system, or hydraulic controls. If you have a fixed-height hoop, you would need to modify the installation or the pole itself to change the height, which can be complex.
Q8: What are the recommended backboard dimensions for youth leagues?
A8: While regulation measuring backboard dimensions are 72″x42″, youth leagues often use smaller backboards. Common sizes for youth play range from 44″ to 54″ in width. The rim height is also typically lowered, often to 8 or 9 feet, for younger players.
Q9: Does the material of the backboard affect measurements?
A9: The material of the backboard (glass, acrylic, polycarbonate, wood) does not directly affect the measurements of its dimensions or the rim height. However, it significantly impacts rebound performance and durability. Glass offers the best rebound but is more fragile. Acrylic and polycarbonate offer good rebound and are more shatter-resistant, making them popular for residential use.
By carefully measuring your basketball hoop and understanding these key dimensions and regulations, you can ensure a safe, enjoyable, and authentic playing experience. Whether you’re setting up a new hoop or just curious about your current setup, this guide provides the ultimate resource for all your basketball hoop measurement needs.